Monday, March 26, 2012

A Pop Up Birthday Card

I wanted to make something fun today so I decided to do a pop up card.  It is actually much easier than you think once you know the trick.  Here is the front...


The base of the card is Taffy.  I have to smile because many people don't care for that CTMH color, but I always liked it.  The lavender is Spring Iris.  The flourish is from a set I just got called "The Best Things" and the sentiment is included in one of the kits that comes in the Art Philosophy Cartridge Bundle.  The pop up is one the inside...
Love this cupcake!  It is also included with the Cricut Bundle.  I've repeatedly told everyone, that Art Philosophy is the best Cricut Cartridge I've ever worked with.  The stamps match the several of the images you can cut.  By the way, the cupcake is colored with my Copics.   Now for the trick to make the pop up...
 1.  First, make a liner for the inside of the card.  For an A2 base, the liner measures 8 x 5 inches. 
 2.  Score the 8 inch length at 4 inches, fold over and crease heavily. 
 3.  Next make 2 one inch deep slits at the 2 1/4 and 2 3/4 marks on the crease.  You will be making the cuts on the 5 inch side.  Make sure that you cut  through both sheets of card stock.  Work you cut out section so that it folds opposite the card crease. 
 4.  Attach the liner to the inside of the card making sure that you do not get adhesive near the cut section and that it remains opposite the crease. 
 5.  Attach the image that you want to "pop-up" on the bottom strip. 

When you fold the card closed, the cut out section will fold flat away from the crease and you image will lay flat.  When you open the card, the image will stand up!

These are fun and unexpected.  I can see all kinds of possibilities to use this pop-up mechanism.  Can't you, too?  :o)  For Now, Happy Crafting!

Sunday, March 25, 2012

CTMH Lasso A Stamp Set Layout

Over 6 weeks ago, I received this chipboard card in an envelope inviting me to the Close To My Heart Convention in Dallas.  When I received it, I hadn't yet decided if I was making the trek to Convention this year.  I laid the card on the shelf.  Within a few days of receiving the card, I made the monumental decision to not only attend Convention, but to also apply to be a presenter at Extravaganza.  For those of you who have never been to a Convention, Extravaganza is a terrific 4 hours where we learn all about the new products from fellow Consultants.  Part of the application requirement was to complete a 1 to 2 minute presentation video.  I remembered that post card laying on the shelf and thought it would be a great way to open my video.  After completing all the necessary requirements for application, the post card went back to the shelf.  A week or so ago, CTMH announced a contest called Lasso a Stamp Set.  The contest is to complete an scrapbook layout incorporating that infamous post card.  WhooWho...mine was still laying on the shelf!  Another requirement was that you had to be signed up to attend Convention. 

As an aside...in order to attend the CTMH Conventions (this year's is in Dallas) you must be a Consultant.  There is a great deal this month...if you sign up to be a Consultant during March, you will receive the Art Philosophy Cricut Cartridge Bundle as a part of your package.  If you already have the cartridge set, you can elect to receive $100 in select product credit.  WHAT A DEAL!  :o)  There is still time, if you have ever considered becoming a Consultant, now is the time.  Send me a message and we can discuss the opportunity.

Anyway, I set out to make my layout and here it is...
As I was thinking about what I wanted to create, I remembered all the fun we had at the 2010 Convention in Washington and I dug out the pictures.  No one was able to make the cross country trip to the 2011 Convention, but several of us are going to Dallas.  Ah, there was my layout!  There are several fun things in the layout.  All of the butterflies and stars are cut with the Art Philosophy Cartridge.  I hand set Bitty Sparkles and the center Sparkles on the largest star. (Whew, that was a task...)  And, if you look closely, the face of the pocket watch in the upper corner has been coated in Liquid Glass to make it look more like the crystal.  There is even an invitation ticket in the lower corner.  Speaking of invitations, if you are already a Consultant, you really should consider going to Convention.  I learned so much in DC while having an absolute blast!

Just for the fun of it, I'm including my Extravaganza Presentation Video.  Now that I have the right camera I think I'll get back to doing YouTube videos.  I enjoyed making that one awhile back about watercolors.
For Now, Happy Crafting!

The March Workshop

Oh, what fun we had yesterday at the monthly workshop!  Unfortunately, a few the the regulars we're able to attend, but we still managed to raise the decibel level with our singing and laughter.  Don't worry girls, I won't post the video of you all singing "Na Na Hey Hey."  :o)  But, I will share a picture or two...
This was our "warm up" card.  I always start my workshops with a simple card to get everyone in the mood to create.  The card featured the brand new CTMH Adhesive Springs (Z1725.)  These pop ups are such fun.  You can attach your image with these pop up dots that are actually springs!  The springs were perfect for the "spring time" sentiment!  :o)

Everyone busy working on their projects...
I was also so pleased to see that the Flowering Pear in the front yard of My Studio was in bloom!  Truly fit with our warm up card.  For Now, Happy Crafting!

Saturday, March 24, 2012

An Experiment.... :o)

This is just a quick post as I haven't had the chance to update my blog in a few days.  I wanted to share an experiment I tried this week.

This is a card that I made playing with CTMH re-inkers!  I wanted to try a different way to make backgrounds.  I promise that I will share the secret in a few days.  I am running late for my monthly card workshop.  Come back and check it out as this is the technique that I'll be teaching in April.  Interested?  :o)  For Now, Happy Crafting!

Monday, March 19, 2012

Today's Floral Arrangement

I just got home from my Floral Design class and thought that I would share one of the arrangements  I completed. 

I spent the rest fo the day working on Saturday's workshop.  I hope to get pictures taken of the last projects tomorrow.  For Now, Happy Crafting!

Friday, March 16, 2012

It's Crafting By Designs Blog Hop Time!

Welcome to the first of what I hope is many Crafting By Designs Blog Hop!  If you came here from Tammy's Blog, you are on the right track.  Our theme is "Wings and Blooms."  A great theme just in time for spring!

I did two projects for you to enjoy today...the first is a treat box made with my Art Philosophy Cricut Cartridge.  I paper from the Roxie paper packet along with Black and Colonial White Card Stock.  I love the butterfly.  His lacy wings are cut using the cartridge layer function and I sponged the body with Smoothie ink.  BTW, one of the fun things about the CTMH paper packets is that they include a strip at the top that can be cut off and added to a project.  See the strip along the bottom of the treat box?
My next project is an 8 x 3 1/2 inch card.  I like doing these cards because they are a little "different" and fit perfectly into a business envelope.  This card uses pattern paper from the Lucy paper packet and the images are from the A Garden stamp set.  If you attend my monthly workshop, this is one of the cards that we will be making!
Crafting By Designs is a great paper crafting website that encourages creativity and friendships.  There are numerous challenges and lots of tips and techniques.  Feel free to hop on over to the site and enter your Wings and Blooms creation in the Challenge section.  Also, I have another treat for you!  If you leave a comment here (along with your email addy) or on any of the participants, you will be eligible to receive a goodie bag.  The winner will be selected from the comments placed on all the participants blogs on Tuesday March 20th.

It's time to hop on to the next blog.  Head off to Julia's Blog and check out her great creations.  Should you get lost along the hopping trail head back to our fearless leader Doris' Blog to get back on track.  Thanks for visiting and For Now, Happy Crafting!

Thursday, March 15, 2012

Handmade Easter Card Colored With My Copics

I had the urge to play with my Copics this afternoon so I grabbed one of my all time favorite Close To My Heart stamps. 


I also wanted to take a quick minute to invite you to check out the new look of my website.  CTMH has been gracious enough to change the look.  It still needs a little tweaking, but it is well on it's way.  By the way, tomorrow, I will also be participating in a Blog Hop sponsored by Crafting By Designs.  Stop back tomorrow to check out some great artwork by many of the members of the site.  For Now, Happy Crafting!


Tuesday, March 13, 2012

Fun Flowers

I thought it would be fun to show you a couple of the other projects besides paper crafting that I've been working on.  I think I mentioned that I recently became the Floral Designer at the Michaels near my home.  I am really enjoying it.  I am also taking classes at the local Community College to become a Certified Florist. 

I've been chatting about about color usage on our paper projects.  It is amazing how so many of the same paper crafting principles apply to not only my floral design, but also, to home decorating, sewing and so many other artsy projects.
This is a cute little arrangement I did in the store a few days ago (glad that I took a picture as it is sold already.)  Anyway, look how I used yellow daffodils and orange crocus.  Yellow and Orange and next to each other on the color wheel  or analogous colors (remember our color wheel?)  Colors next to each other on the color wheel always work together.  By the way, that is a little kid's rain boot and a pinwheel.  :o)

This is last night's class arrangement....the pink carnation on the right slipped a tad in the vase on the way home...oh well.  See how my main flowers are pink and yellow?  Pink (a tinted form of red) and yellow are Primary colors.  We have chatted about how the primary colors always coordinate, too!

It is fascinating to me how so many of the things that we do in paper crafting are applicable in so many other things we do.  See, I have just given you an excuse to dig out your papers, inks and markers!  For Now, Happy Crafting!

Thursday, March 8, 2012

Paper Craft Tips Using CTMH Florentine

A few posts back, I talked about how trendy hand stitching on your paper projects is right now.  Well, I recognize that not everyone has the time or inclination to stitch on their creations.  CTMH has the perfect solution to achieve the look without the fuss.  "Stitched Together" (C1459) is a great stamp set that contains several images of stitches along with 4 shapes that have been stitched.  All you need to do is stamp the stitching on your project!
This card features the Stitched Together stamp set around 2 of the mats.  See how it looks like hand stitching!
Here is the full card.  The pattern paper is from Florentine.  Love that new paper packet.  The flower and leaves are from Card Word Puzzle (C1494.)  It was stamped, colored with my Copics and then cut out and attached to the Bamboo mat.  "Sending Warm Wishes" is from "A Garden" (A1119).  I also ink distressed and sanded on the project.

Now, for your next tip...I have been talking about color choices.  In this card, I used Twilight for the card base and Olive for the 1st mat.  CTMH makes it very easy to choice coordinating colors by providing you with CS  that matches perfectly with the pattern paper.  But, it is always good to know why the colors work together.  Blue and Green always work together because they are next to each other on the color wheel.  They are called Analogous colors. 

Take a look at Twilight pictured on the top.  Blue is a primary color which means that no other colors are mixed together to create that color.  The Primary colors can be altered in a few different ways.  Today, we are going to talk about color "value."  The value of a color is altered by the amount of gray you add to the color.  If you look closely between the Twilight and the Sky color, can see that Twilight appears darker.  It also has more gray in it than Sky.  Sky is a clear blue color.  Twilight has a higher "Gray Value" than Sky.  Now, let's look at what happens to "green."
You can see that Olive has a higher "Value" than Pear.  More gray has been added to the base green.  
Blue and Green are Analogous colors that will work well together; but, when picking blues and greens, or any two colors to use together, it is best to chose colors that have the same gray value.  When you look at the 4 colors together, notice how the Sky and Pear show up brighter and would overwhelm the color with the higher gray value.  Now, here is the completed card again...
See how neither the Twilight or Olive overpower because they are the same value.  I even used gray value Copics when I colored my flower.  Knowing why colors works together helps you take your projects to a new creative level.  For Now, Happy Crafting!

Wednesday, March 7, 2012

Mixing It Up With CTMH Pemberley

One of the great things about the CTMH Idea Book is that there are always stamps that coordinate beautifully with the paper packets.  The new IB is no exception.  Pemberely is a terrific paper packet that combines lovely brown tones with a variety of blue tones.  Coordinating with that paper packet is a new stamp set called Card Work Puzzle.  It is probably one of the most versatile sets I have ever owned.  Check out the card I created a few posts back...

But, one of the fun things I like to do when a new Idea Book is released, is to study the new and older stamps and paper packets and see what will work together that perhaps hasn't been demonstrated.  I went off and really let my creative juices flow with Pemberely.  :o)
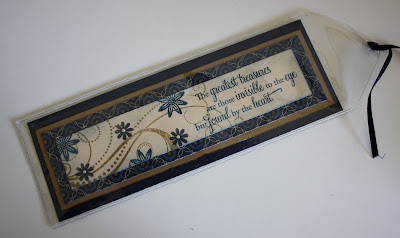
I am going to the CTMH Convention this year...yeah!  One of the fun things to do are the "swaps."  Everyone makes multiples of a project and then trades them with fellow Consultants.  It is a great way to get new ideas and have different samples to show off.  I wanted to get my swaps started and decided that I would make bookmarks this year.  At the 2010 Convention, one of my roomies made bookmarks and I STILL use the one she gave me!  Thanks, Tracy.  :o)  Anyway, I wanted to make something for my fellow Consultants that they could have an use.  I studied the paper packets and realized that Pemberely had so many different possibilities.  Look closely, it has symmetrical designs, it has a variety of colors, it has flowers...wow...love it!  I then studied all the different stamp sets and came up with these three that coordinate beautifully with the paper packet. 
The flourish is from Live Inspired.  It was released last IB and coordinates  with the Elemental paper packet.  The sentiment and larger flowers are from Heartfelt Treasures.  It is also still current and went with a now retired paper packet called Sophia.  Last but not least, the small flowers are from one of my go to stamp sets called "Tag the Occasion."  It is also still available.  It has several sentiments and small matching stamps for embellishments.  Look how terrific it all goes together.  With just a few minutes of "studying" it is easy to coordinate the old with the new!

I just wanted to ask, I used the new Bitty Opaques Pearls to highlight the centers of the small flowers.  I was thinking about using sparkles instead...let me know what you think,  :o)  For Now, Happy Crafting!

Sunday, March 4, 2012

More Projects Using CTMH Lucy Paper Packet

I am really having fun with the products in the new CTMH Idea Book.  Today, I worked with one of the really cute new "My Creations" 3D items...a milk carton.  How cute is that...

The milk cartons come in packages of two (Z1739).  They are white, so first thing I did was paint it with a mixture of blush re-inker and Pearl Paint (Z1039.)  One of  the problems with having a nice camera is that it shows ALL the imperfections...you will just have to trust me...the paint is not streaky in natural light. hehehe Anyway, I cut the mats to fit each of the 4 side panels using a patterned paper from Lucy along with Sweet Leaf and Gray Wool card stock.  The images are stamped using "A Garden."  I love this cute new stamp set (A 1119).  The set contains branches, flower stems, a flower, a butterfly a bird and 3 different sentiments...all for $6.95!  You are able to assemble the images anyway you wish.  I stamped the leaves of the branch in Pear and Sweet Leaf.  I sponged over the stamped leaves with Sweet Leaf to fill in the grass and then sponged the top of the CS with Sky to make the sky.  The bird, flowers and butterfly were stamped and then colored with my water color pencils.  I used Stardust Glitz Glitter Gel to add just a touch of bling and finished up with Gray Bakers Twine around the Milk Carton.  I can't wait to put my malted milk balls in it!

Here is another card I did using the same stamp set and the Lucy paper packet.

I cut the card base using the Art Philosophy Cricut Cartridge...I just can't get enough of the Cartridge.  I've said it before, but it truly is the best cartridge I have ever used.  The 2 mats were cut also using the same image but with a different function key.  I sanded the square mat and dug out my 2 inch scallop punch to make the sentiment mat. 

Don't be afraid to try the unexpected.  The Pearl Paint adds a nice spring like background and with "A Garden" you have the opportunity to create your own spring scene!  By the way, these are two more card for my March Workshop.  For Now, Happy Crafting!

Thursday, March 1, 2012

Stitching on a Card

The other day I mentioned that paper flowers are one of the hottest trends right now.  Well, another hot trend right now is hand stitching.  It is actually very easy!  I have used my sewing machine to stitch on a project but truly I find that it really is easier to just do it by hand.  I made this card and did all the stitching by hand.
Look how even those stitches are...hehehe...let me share with you how I did it.  CTMH makes a ruler that has guide holes in it!  You merely lay it along your paper, poke holes with your paper piercer and then grab your need and thread.  So much easier than dragging out the sewing machine, breaking the bobbin thread and doing the back stitching.

A few other interesting things about this card.  The dragonfly base is a from the new Color Ready Garden Wooden Shapes.  The shapes contained in this embellishment pack match the Art Philosophy Cricut Cartridge.I cut the base and wings from a lacy pattern contained in the Lucy paper packet.  The body is cut in Gray Wool.  If you look closely, I added Liquid Glass to the center of the wings.  The other pattern papers are also from Lucy.  The sentiment has been heat embossed on a metal photo clip.

This was a fun card to make...so many different things going on.  Please don't tell my husband that I sewed on a card because he will expect me to sew on those missing buttons.  For Now, Happy Crafting!